In my spare time I work on a number of different projects to help me keep up to date on my skills, along with helping out friends and family with their problems. One of my current projects involves a photo gallery so I needed to write some code to manipulate images.

I know there are a good number of libraries and NuGet packages out there which solve this problem, but I only needed to crop and scale images, no other fancy features and felt it would be a good exercise to write the code myself. It ensures I understand what is happening under the hood (allowing me to be in control of possible file locks), and removes dependency on a large library which would have way more features than I would ever make use of.

First I created a simple image cropping function, which has no validation to confirm the cropping ranges given are within the bounds of the image. I have logic for this elsewhere in my application, so I did not feel the need to duplicate the logic.

public void CropImage(string inputPath, string outputPath, int x, int y, int width, int height)
{
    using (var sourceStream = new FileStream(inputPath, FileMode.Open, FileAccess.Read, FileShare.ReadWrite))
    using (var sourceImage = new Bitmap(sourceStream))
    using (var result = sourceImage.Clone(new Rectangle(x, y, width, height), sourceImage.PixelFormat))
    using (var destinationStream = new FileStream(outputPath, FileMode.Create, FileAccess.Write, FileShare.ReadWrite))
    {
        result.Save(destinationStream, ImageFormat.Jpeg);
    }
}

Next I needed a function to scale an image, stating what the maximum dimension should be. To understand what I am talking about, here are some examples.

Example 1

Given an image with a width of 300 and a height of 100, if I ask for a maximum dimension of 150 this will result in an image with a width of 150 and a height of 50.

Example 2

Given an image with a width of 100 and a height of 300, if I ask for a maximum dimension of 150 this will result in an image with a width of 50 and a height of 150.

Explanation

The code will look at both the width and the height of the original image, determine which is the bigger dimension. It will then calculate the scale difference between that, and the requested maximum dimension, and it will then scale both the width and height to this given scale. In the examples above, the scale is always 50%, so both the width and height are halved.

One other thing I do with the code is that I do not assume that the input and output paths are different, and that people may in fact want to replace an image with a scaled down variant of itself, which is why I have the code structured the way you will see below.

public void ScaleImage(string inputPath, string outputPath, decimal maxDimension)
{
    using (var sourceStream = new FileStream(inputPath, FileMode.Open, FileAccess.Read, FileShare.ReadWrite))
    using (var sourceImage = new Bitmap(sourceStream))
    {
        var maxImageDimensions = Math.Max(sourceImage.Width, sourceImage.Height);
        var scale = Math.Min(maxDimension, maxImageDimensions)/maxImageDimensions;
        var width = (int) (sourceImage.Width*scale);
        var height = (int) (sourceImage.Height*scale);

        using (var newImage = new Bitmap(width, height))
        using (var graphics = Graphics.FromImage(newImage))
        using (var destinationStream = new FileStream(outputPath, FileMode.Create, FileAccess.Write, FileShare.ReadWrite))
        {
            graphics.SmoothingMode = SmoothingMode.HighQuality;
            graphics.InterpolationMode = InterpolationMode.HighQualityBicubic;
            graphics.PixelOffsetMode = PixelOffsetMode.HighQuality;
            graphics.DrawImage(sourceImage, new Rectangle(0, 0, width, height));

            newImage.Save(destinationStream, ImageFormat.Jpeg);
        }
    }
}

Today I was struggling to access my MongoDb instance from another machine in the same network. At first I had assumed it would be firewall settings, but later on I found out it to be a MongoDb setting.

I work on a Macbook running Mac OSX, however I do have Parallels installed for me to do some work from Windows when I need to. On the Mac OSX portion, I have MongoDb installed and since I already have it there along with all the tools I use for it, I did not see a point to installing yet another instance within my Windows VM when developing a prototype.

My thoughts were that I could just open up some firewall settings, allow the Windows machine access to my Mac’s instance of MongoDb and get to work. After an hour of banging my head on the table, wondering why I could not access it remotely I discovered a setting which explained it all!

I typed the following command (I installed MongoDb with Homebrew, so your path may vary).

vim /usr/local/etc/mongod.conf

Inside I found the following

systemLog:
  destination: file
  path: /usr/local/var/log/mongodb/mongo.log
  logAppend: true
storage:
  dbPath: /usr/local/var/mongodb
net:
  bindIp: 127.0.0.1

Notice anything that might cause a problem? Take a look at the very last line. That line is telling MongoDb to only access requests from the local machine, which is a great default when deploying to a new server, but when developing prototypes on a local dev environment, it is a pain in the rear! I opened it up completely by changing it to the following:

net:
  bindIp: 0.0.0.0

Now if you are a bit more sensible than myself, you will not want to open it up completely and will still want it restricted, but to perhaps 2 or 3 different machines. Well, you are in luck as that configuration is in fact able to take a comma seperated list as follows:

net:
  bindIp: 127.0.0.1,192.168.0.100,192.168.0.150

The above will restrict it to allow connections only from localhost, 192.168.0.100 and 192.168.0.150.

Now after you change the config, you need to restart MongoDb to make it reload the new settings, with a Homebrew install that is simply running this command.

brew services restart mongodb

At work I was writing a number of simple self hosted services with NancyFX, however normally at home I would host these on my Linux server and make use of nginx which makes this extremely simple. At the office however we were using IIS, which required some extra tweaks and configurations to get working, so I thought I would share how it is done for anybody else that may want to do this.

You need to install two additional modules (official from Microsoft) onto your IIS installation, and unfortunately I have not looked to see if this works on older versions of IIS, but I know it works on version 7.5 and above. The modules you need to install are as follows…

Once you have these installed, open up IIS, go to site settings and you should see a URL Rewrite icon. This is the indicator that it has installed correctly, now personally I am not a fan of the UI for making my changes mostly because I want simple changes and I find the interface way too complicated to do simple changes. Instead of working with the UI, I am going to tell you how to do these changes with the web.config.

Visit your default website’s folder, and if there is not already a web.config in there, add one, and open it up in your favourite text editor. Within the system.webServer tag, I added the following snippet of code.

<rewrite>
    <rules>
        <rule name="MyUniqueRuleName" stopProcessing="true">
            <match url="^API/(.*)" />
            <action type="Rewrite" url="http://localhost:45000/{R:1}" logRewrittenRule="true" />
        </rule>
    </rules>
</rewrite>

Now that for me is way easier to understand and maintain than fiddling with some UI tools, but for those of you who need a little help understanding the structure of this config, read on as I will explain it.

So the rewrite tag is simply how the IIS module can find it’s code, and then the rules tag will be the wrapper around every rule we add. I have not looked into the upper limits, but potentially you can add as many rules as you want within the rules tag.

The rule tag is the first important tag as it is your actual redirect rule, which has two attributes. The name which has to be completely unique from every other rule, but in general does not matter what you call it, it is more an indicator for you to identify what the rule should do. The stopProcessing tag simply tells IIS after I receive a request that matches this rule, you can stop processing this request and where ever I send this request, it will take over for you. In my instance, I am sending everything off to a self hosted NancyFX service.

Inside of the the rule tag you are able to set a match and an action. The match is a regular expression to try match the incoming request URL, and the action is telling IIS what you want to do with that request. For each match group in the match, you are able to use that in your action url with {R:#} which the # is the number (counting up from 1), for the match group. The logRewrittenRule attribute is a simple boolean telling IIS if it should bother logging the incoming request to it’s own logs or not, and in general I like to keep this set to true, as I feel you can never have too many logs.

Now let’s try to better understand this code with some examples.

Given the following request URL : http://www.cyber-lane.com/API/blog/2016/03/22/index.html The server will call the internal URL : http://localhost:45000/API/blog/2016/03/22/index.html

My regular expression (.*) is catching everything after API/, which in this instance is blog/2016/03/22/index.html. This can of course be completely manipulated however we want, but again, this was exactly what I wanted and served my needs. I hope this code helps some other people out, and feel free to ask me questions if you need further clarification or examples.

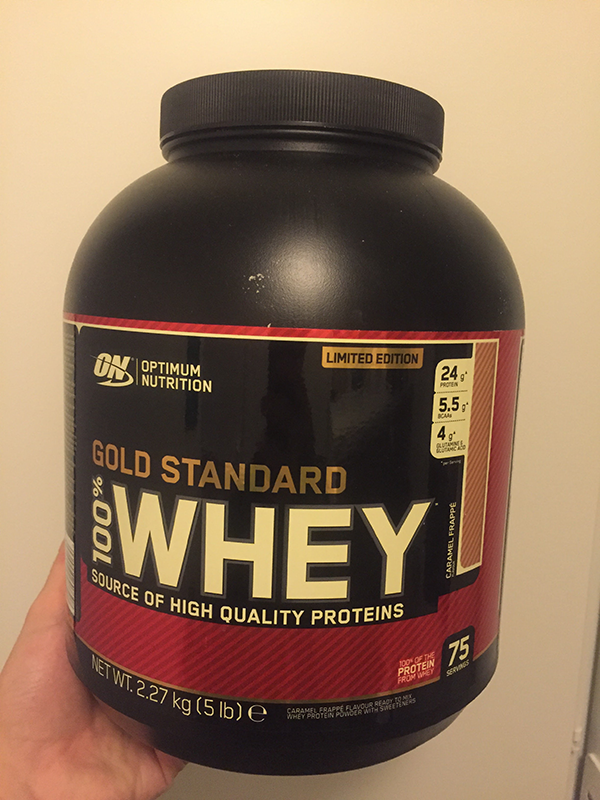
Today I will giving you my personal opinion on Optimum Nutrition’s Caramel Frappé protein powder.

Protein_Powder_Picture

100 grams of powder

Enegy: 381 kcal
Fat: 4.0 grams
- of which saturates: 1.3 grams
Carbohydrates: 4.5 grams
- of which sugars: 3.6 grams
Fibre: 0.8 grams
Protein: 81 grams
Salt: 0.44 grams
Sodium: 175 milligrams

Pros

  • Easy to mix, no lumps at all
  • Creamy taste, small hints of coffee with main flavour of caramel

Cons

  • Limited Edition flavour, no longer available!

So overall I was a big fan of this protein powder, so much so that I finished it a little faster than usual (more snacks on protein shakes than on protein bars) but unfortunately at the time of writing this post, it is [no longer stocked]((http://www.gymgrossisten.com/1/sv/artiklar/100-whey-gold-standard) by GymGrossiten.

The past year I have been working a lot with EPiServer in a number of different ways, ranging from creating integration packages, to simply adding additional features for some specific customer requirements. However, out of everything the most troubling was when I was trying to add PayEx integration.

About a month ago my client asked for me to add PayEx integration to an existing project they had, and they were all very skeptical of doing this as it took some people months to do, whilst others managed it in a number of weeks. The biggest concern is that there was no standard amount of time to add this feature, and unfortunately all the people who had done this previously were contractors who had since moved on to new clients and were not available to explain everything they had done. So the challenge was set upon me to add this feature, but lucky for me, Karoline Klever had written and published an OpenSource PayEx library for EPiServer!

Unfortunately the documentation for the library relied on you using the standard workflows in EPiServer to get everything done, but my client’s project was doing their own bespoke methods for almost everything. In a later blog post I will cover a step by step guide to help others in the future with this, but in this post we will be covering a certain difficulty I had faced with ExtendedPrice on the LineItem object.

On the LineItem object you are free to add whatever you want into the ExtendedPrice field, there is no standard of what is the correct thing to put in there, but the most common thing that people put in there is the total price for that specific line item, taking into account all discounts for quantity, and any other promotions that may be going on. The one thing that most people do NOT keep consistant however is if this should include or exclude VAT. Now I had no idea about this when I had originally started working on the project, I had assumed that everything would be calculated at the point of time that it was needed. None the less, after I got PayEx up and running, taking payment from the checkout process was extremely simple, but after you are redirected back to the checkout, you need to call a WebService at PayEx and find out if the payment was successful, and if so, complete the order process for that shopping cart. Each time I queried, I was given the error AmountNotEqualOrderLinesTotal. I checked the amount, I added up the totals, and everything seemed correct to me, I had no idea what was going on. After a little digging around, I eventually found that the English on the payment process of PayEx was what was causing the problem. They are a Norwegian company, and they do speak great English up there, but unfortunately they made a big mistake here.

PayEx_Including_Tax

Where it says Including VAT, it should be saying Of which is VAT. Basically, the amount in the Price column should be the product total including VAT whilst the column to the right should be how much VAT is included in that. The total of the Price column needs to match the Amount at the top left. If this does not match, the transaction will fail with the AmountNotEqualOrderLinesTotal error! After knowing this, I then discovered that my client was storing the total value excluding VAT inside of the ExtendedPrice field. I had to make a quick hack NuGet Package to solve this, which I plan on marking as invalid once I send a pull request to PayEx with a better fix to allow for both Including and Excluding VAT options to their library.